The first step is to check the Registry for 'Run' and 'Windows Load' commands to see what starts when the computer boots up. To run Registry Editor, click Start -> Run and enter REGEDIT. To find the Run and Load entries in your Registry Editor, search Google for your operating system's "registry locations". Since the word "run" is used frequently in the Registry, it's best to find the location and navigate directly there. (Quick tip on finding these entries: Click Edit -> Find in the Registry Editor and search for "RunOnce". Near the RunOnce entry you should fine the "Run" entry. Navigate one level back and you should find the "Load" entry.)
Once you find a branch of Registry keys for 'Run', check each program that is listed. Search for the program names on Google if you aren't sure what they do. Disable anything you don't want here by saving the Registry entry for backup, then deleting that specific entry. Or you can leave the Registry name behind for reference, and clear out the key entry path and executable from the right column. The Registry won't run any blank entries.
At this point the Registry entries tell you what software is installed on your PC, which will be helpful later. You also know what device drivers are required by your computer. To verify that you have checked all start up locations, click Start -> Run and enter MSCONFIG. Click OK to start the program and check the Startup tab to confirm your start up programs are correct. This can also be used to temporarily uncheck/deselect start up programs for testing.
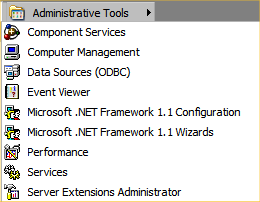
Now it's time to check the Administrative Tools or Admin Tools. If you can't find Administrative Tools on your operating system, search for it at Google by entering "Enable Administrative Tools Vista" or "Enable Administrative Tools Windows XP". It may be hidden by default on your operating system. For instance, on Windows XP, right-click your Start Menu, click Properties, click Customize, and check the Show Administrative Tools checkbox.
Once the Administrative Tools are enabled, they will show up in your Start menu in a new folder.
Start the Services program in Admin Tools. Check each Service in the list to determine if it should be disabled. If you are unsure, search for the name of the Service to see what it does. You can try a Service on Manual, then reboot, to see if the Service was activated by a startup process.
Once you are done checking Services, check the Add/Remove Programs list in your Control Panel to see what you want to uninstall. I usually uninstall trial programs and programs that I don't want to keep. If you have disabled a Service and don't need it again, you may be able to uninstall the application from Add/Remove Programs. Check Google if you are unsure what a program does for your PC.
Now open your Device Manager and check for any problems. Problem devices will appear with a yellow triangle with an exclamation mark.
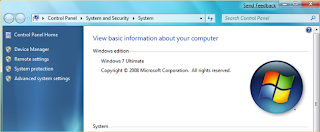
If you can't find your Device Manager, check the screenshots here for Windows XP and Windows 7 Device Manager locations.
Now restart your PC and check your Event Viewer under Administrative Tools for any errors on shutdown or startup. Some programs may cause errors if they are not closed before shutdown. Also you can find drivers that aren't working, or missing programs. Sometimes a program will be updated with a new file version to fix these errors.
At this point, run Windows Update and update your operating system. Then update any programs that are pre-installed, like antivirus applications or productivity suites, or any programs that do not seem to close properly or run smoothly.
 Next run DXDIAG from the Run command to check the status of your audio, video and system driver settings and make sure everything is working. DirectX Diagnostics can also check that your drivers are WHQL-compliant, which means they will work with DirectX applications.
Finally troubleshooting is done and you are ready to install your own software. I recommend that you run System Restore now and name the backup something memorable, like "Clean Install". If you have a Home Server, this is a good time to backup the entire system. Other backup options are: USB hard disks, CD-ROMs, DVDs and USB Flash drives.
If you want to manually back up your computer, follow these steps:
- Export your entire Registry as 'CleanBackup_TodaysDate.Reg'
- Archive or 'Zip up' all of your "My Documents" files into one or two files (using WinZip).
- Zip up your Desktop files into a file called "Desktop_TodaysDate.zip"
- If you want all application settings, My Docs and Desktop items, zip up complete user folders in the Documents and Settings folder (this location name is different for Windows XP, Vista and Windows 7).
- Copy your backup files to a USB hard disk, CD-ROM or DVD for monthly backups.

